A mixed media piece

A mixed media piece

Sunday, 7 February 2016

Deco Art experimenting with Dazzling Metallics


Hi Everyone I hope you are well as my followers will know I am on the 
Deco Art Outreach blogger program & have been for about a year now
if not a bit longer. I generally use Deco art products in most of 
my projects as I love the range but I mainly stick to the Media 
Range but wanted to try the Dazzling Metallics range. This
range has a vast array of colours and numerous
golds again a great favourite of mine.
 So for this first play with using it on a project I started with a tag
and stamped a heart on it 4 times in black staz on. Next I used
ecoline inks to trace round the hearts lots of water and
brown Bistre was sprinkles and spritzed with water
till I was happy withe the result.
Next I picked 5 golds from the Deco Art Dazzeling Metallics range 
Rich Expresso is @ the very bottom,  Venitian gold, splendid gold,
 emperors gold covered with Champagne gold. next I used 
the media range clear crackle glaze which 
I applied with my finger.
while I waited for the glaze to dry I covered a Tando creative 
small key with texture sand paste which again I applied
 with my finger. 
Once dry I painted it with Media carbon black fluid acrylic paint
 once dried I then picked up Rich expresso with my finger and just 
lightly touched the key so it just picked it up in areas, 
very much how you would used treasure gold.
Back to the hearts the gold is translucent so again using my fingers
 I used Media antiquing cream in black over the hearts and 
knocked back once dry with a baby wipe.  
My fingers are looking glorious by now!!!!
 The black has gone into the cracks as you can see above.
Next I gave the whole tag a coat soft touch matt varnish to seal the 
inks and bistre but did not go over the hearts. I then covered 
the area again with deco page matt sealer then I 
applied stamped tissue paper over the top. I
have just realised there is some glue residue 
on the above heart just be careful.
I pulled off the tissue paper and decorated my scabbed pieces with
carbon black media fluid acrylic knocking it back and edging with
rich expresso all applied by my very messy fingers!!!
I backed it onto black card they had been roughed up with a blade then 
edged with rich expresso think this might be my favourite.
Okay so what I learned was that the colours are translucent
 which I love as you can just glimps the pattern
 underneath. The other brilliant thing is they are 
all interchangeable across the range's.
I also find it helpful to make colour charts of the colours I have on
both black and white card as colours vary on different backgrounds
also it fives you a feel of how to work the paint and its properties 
as all paints have their own. One last bit of information 
regarding Deco art products they can be purchase from 
Hobby craft and are very reasonably priced compared to 
some of their competitors. 
These really are amazing products go and try for yourself. 
Well that's it for today folks thank you for popping by please 
let me know what you think and if you found it useful.
Cheers Dee x

Thursday, 4 February 2016

Heart Art Part II The Love Letter

Hi Everyone I hope this post finds you all well. I have a sneaky 
view of the second part of my earlier post for 
Our challenge this months is hearts why not pop over and see if this can 
inspire you to join in with us for your chance to win
 some lovely stamps.
Please feel free to leave a comment or two as these really make it rewarding and 
help to inspire me on. I work full time as many of you do and don't
 always managed to get back to you but please be assured 
that they all mean a lot to me.
Cheers Dee x


Monday, 1 February 2016

Heart Art Part I 'The Love Keepers Box'


Dee
Hi everyone I hope you are all well and looking forward to our next challenge over at the Artistic Stamper the tittle is Heart Art. I have done a two part piece for this challenge
this being the first part.
I have created a lid on a wooden box using some of the amazing stamps from The
 Artistic Stamper Neil Walker's Doodle Bubbles & Large Heart & Bark Background. Firstly 
I put a layer of texture paste onto the lid of a wooden box. Once it had dried out 
a bit but before it had fully set I wet the Neil Walker Doodle stamp
 and pressed it into the texture paste and allowed to fully set.
Next I coloured the wooden box lid with Distress paints and the outside
edges. The edges were then stamped with the bark background stamp 
and varnished with Deco art gloss varnish from the Media Range.
I only glossed around the edges not on the lid.
I used media antiquing cream in black after the paint had dried, this was 
then knocked back with a baby wipe. This was followed with a touch 
of treasure gold.
I used a Tando creative key that I had covered in Deco Art
texture sand paste and then painted
it with Deco Art Paynes grey from the Media Range.
This was followed with dazzling metallic's venetian gold. A piece of 
craft paper and torn black card was glued beneath the key.
The heart was made by triple embossing onto black card which was then 
stamped into once hot. It was all finished off with three Chinese coins 
from my stash.
Don't forget to look out for part II on the 4th Feb 'The Love Letter'
I hope that this has inspired you to join in with us at
The Artistic Stamper
for this months challenge of heart art.
Cheers Dee x

Sunday, 24 January 2016

A mornings play at The Artistic Stamper

Hi everyone I hope you are well Thank you for popping by, I would like to say a warm welcome to my new followers as well.
I popped down to see Jennie @ The Artistic Stamper and she had a journal class on 
so would be rude not to join in. As journaling is really new to me I
decided to choose new colour choices (for me).
I got to try the Dylusions paints I must say I hadn't tried them before its very interesting to see the different properties each paint delivers I did like the finish these paints give to the page.
For this page I used the delusions sprays which are translucent and as it was sprayed on craft paper most probably lost a lot of the vibrancy of the inks. That's it for today folk's quite enjoyed stepping out of the box and for Jennie no butterflies or dragonfly's.
Cheers Dee x

Friday, 22 January 2016

Ohh!! I Do Love a Dragon fly By Dee over at AS

Hi Everyone I hope you are all well it is my turn again over at 
Why not pop over and see how I created this.
A close up of the dragon fly 
Well that's it for today I hope you all enjoyed my post 
please feel free to let me know what you think.
Cheers Dee x


Tuesday, 19 January 2016

Anything goes over at Tando


Hi everyone I have my latest project for you today over at the Tando creative Blog
This weeks theme is anything goes I have used today the lovely
small printer tray.
Why not pop over to the challenge blog and see what the team have designed
to inspire you to enter the challenge and to see 
what Tando goodies you could win.
Cheers Dee x


Sunday, 17 January 2016

Make a card over at Tando

Hi folks its Dee here with you today I hope you are all well
and that your new year has got of to a crafty start.
It's my turn over on the Tando blog the challenge is make
a card.
Why not Pop over to the Tando Creative blog to see 
what I created and how. 
Cheers Dee

Friday, 15 January 2016

SanDee&amelie's Steampunk Challenges

Hi Everyone I hope you are well and have had a good start to the year.
All the DT team over at Sandee & amelie's steam punk Challenges
are spot lighting their use of Deco art products this month all of you 
that know my blog will know that I use these products all the 
time in my work. so its very hard to pick just one as they are all
amazing and this project uses quite a few.
Deco Art is our new sponsor over at SanDee & amelie's Steampunk Challenges.
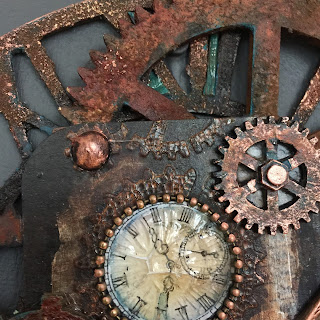
I have used Tando creative media boards, clocks, & Chip board 
cogs.
I used Tim Holts texture fades & embossing folders  I covered card 
with aluminium foil tape and put it through my machine.
Next I painted with raw umber and used the
  Antiquing creams to age the badge.
This photo shows the cogs which were covered in texture sand then painted 
with Raw umber then quinacridone gold. Treasure gold just to 
highlight the texture.
I used Tando Creative mixed media board for the centre piece which I then decorated 
as follows. 
Crackle paste put through a cogs stencil then painted with Raw umber once 
dry. Next a coat of english red oxide was used which you need to apply
in watery washes. a light cost of crackle paint again the media line was 
painted around the crackle paste cogs.


Cog's are treated as above the larger ones have got actual rust 
powder on them the edges were just touched with 
Prussian Blue hue.
A clock Stamp from my stash was coloured the given a coat of crackle
 glaze to appear like the watch face has cracked.
Various pieces from my stash and stamps were used to decorate 
it. The final clock was treated the same way as the cogs 
and all highlighted with guiding wax
So today's tip is crackle paste is a lot thicker that the paint but to use lots 
of washes to create with the media line. These really are amazing products 
and offer an extensive range to create whatever effects you crave.
Why not pop over to the Challenge blog by clicking the link below and 
joining in with us  for a chance of winning these fabulous products.
That's it for today folks thank you for dropping by.
Cheers Dee x

Our New Sponsers for 2016
DecoArt Sponsor Badge

"As SanDee&amelie's Steampunk Challenges have the great honour and pleasure of having gained DecoArt as their "one and only" prize sponsor from now on, the whole team decided to put a special spotlight on some of the fabulous products from their wide range of media and paints.

So this month each DT member did not only use DecoArt paints and media on her DT project but also introduces to you more closely one of the products she has used. "

Tuesday, 12 January 2016

WONDERLUST

Hi to everyone and a special welcome to my new followers.
I have joined everyone else in taking part in Wanderlust!
I wont go through the hows but this is my first piece.
I am working my way through Katy Crain's videos at present.
I really quite like this page it looks better in reality as you can
see the different layers.
As you know I do love layers.
Some more pics!
& more
Sorry getting boring now!!
Ops Man U have just scored the men in my house have 
just woken up the street!!
That's it for today folks have a new post for SASPC on 
Friday with exciting news for you about 
our challenge sponsors.
Cheers Dee x


Wednesday, 6 January 2016

This months colours over at Tando creative

Hi everyone I have for you my second post of the New Year,
you can pop over to the Tando blog to see how
I created this piece.


Thanks for popping by don't forget to pop over and check out the Tando blog.
Cheers Dee x


Monday, 4 January 2016

A Finnabair inspired butterfly over at The Artistic Stamper

Hi Peeps I would like to wish all my followers and visitors 
to my blog a very Happy New Year. I have a 
sneak peek of my latest post over at the
Artistic Stamper.
Why not pop over to The Artistic Stamper blog to see 
the how to. 
Cheers Dee X